
People always ask me to give them the nuts and bolts of how I teach my students to publish their work online. I’m always hesitant because I hate when people tell me exactly how to do something. That feeling started whenever I would do a chore for my dad. If I was hammering a nail my dad would remind me, “swing from your elbow.” I hated doing chores at home because every chore was accompanied with a story and a lesson. I didn’t need the story, I only wanted my dad’s help as I needed it. This method of relentless direct instruction led to my adopting George Patton’s mantra:
“Never tell people how to do something, tell them what to do and let them surprise you with their ingenuity.”
I’ve always felt that the best professional development is “on time” assistance, however my response is not universal. Not everyone wants to find their own way. Some people want to learn from someone’s experience. I too love picking the mind of someone with experience. Sometimes when you see a new tool, you want to learn a little about it before swinging it around.

Hammers from the annual OCO Mochi Making Festival
For the past three years I’ve had my students publish their writing online using WordPress.com. I have already written a detailed blog post on why your students should blog online. I highly recommend reading that post and the follow-up post written by Sean Ziebarth. This blog post is a step-by-step exploration of how to get your students to publish their work online. If you have any questions, please feel free to ask in the comments below, or through contacting me @davidtEDU on Twitter and I’ll add the new information below.
Welcome to my shop, let’s make something today.

Most of these pictures will be from my dad’s garage.
I use WordPress.com
Why?
I think it looks more professional than Blogger (sorry Google) and other publishing sites. Helping young writers look professional is a good thing. If you want to use Weebly or Square, that’s fine with me.
I want all of my students to be on the same publishing platform with each other so that they can like, follow, and comment on each other’s blogs more easily. THE MOST IMPORTANT reason why my students use WordPress.com is that I use WordPress.com. Since I use it, I can help them with their questions about the publishing platform. This leads me to a crucial pedagogy reminder:
“If you are asking your students to do something, you should have recently done the task yourself.”
You do. I do. That means whatever they do, I’ve done it first.
Please, please, please… don’t be the teacher who asks students to do something that you don’t want to do yourself. If you assign study guides or worksheets, you should do those and see what it’s like and how long they take. If you assign blogging because it’s important then- YOU SHOULD BE BLOGGING TOO. It can be once a week. It can be once a month. The posts can be short. Just do it. You’ll become a better writer and you’ll remind yourself about the struggle of picking a good topic, audience awareness, word choice, visuals etc… You are showing your students that writing is a lifelong activity, that reflection and communication is always important in our society.

I usually wait a few weeks to get started with online publishing in my classes. (I’m going to try using the term blogging less this year, because students equate blogging with keeping an electronic diary and think that bloggers just write whatever is on their mind and that they don’t care about good writing)
Usually I start our online publishing the week after back to school night.
I start it with a half period talk about why I starting writing online, and why I think publishing online is a worthwhile class activity. Here is one of the why I blog presentations that I use with my students.
Final note before starting: When I first started blogging with my students I started at the end of January aka 2nd semester. It worked fine doing it for one semester. If that’s all you can handle at first, if you want to get to know your students and do your traditional class activities first semester, that’s okay with me. Just try student publishing for one semester and let me know what you think.

Show the following presentation to your class for step-by-step directions on how to start a website or blog on WordPress. If you are using something besides WordPress.com you should create a similar step-by-step presentation, screenshot document, or screen capture video showing the students how to start on the website platform you have chosen for your class.
The key points are making sure they confirm the blog via their email and making sure that they pick a good title and a theme that’s easy to read and navigate. Students love theme shopping and it’s FREE.
NOTE: when they sign up for wordpress don’t let them use their full name as their wordpress user name or as the name of their site or the url of their site. In order to help protect students, I don’t want their readers to know who they are. I have students only use their first name on their blog, their about me page etc… when I first started I would allow them to use nicknames, but that was a mess for me to remember who was what nickname.
Once they’ve figure it out have them write their first post. Something really short. Make sure they include an image in their first intro post. At this point you aren’t worried about the quality or quantity of their writing, you just want to make sure they can start the site and make a post on their own. Don’t complicate their lives by requiring a big first post. They need to have this done by Thursday night in order to be ready for step four.
This year I experimented with them creating their “About” pages as the first step. I’m not sure if it will work as well… we will see.
Using a Google Form or the submit tool of an LMS have every student submit the url of their first post or “about” page. Then go down the list and look at every student’s blog. Look at the title, look at the theme, make sure they actually have a blog. I discourage students from using blogs with a black background or a dark background because they are a pain to read. We do this IN CLASS on Friday and go through every blog. I project the blog on the screen using our digital projector. I ask questions, give tips etc… If they are blogging with a group the whole group goes up to present the blog. I just want them to prove to me that they know how to start a blog and publish a post, so that if they want to change their blog before step four, they can.

You need to do two things during the 2nd week.
First, create a Google Form asking for the following information: last name, first name, period, Name of blog, url of blog, brief description of their blog, blog login, and password of blog. Once students pick a blog title they should fill out the form. Once everyone has submitted this information, download it to a desktop file, BECAUSE Google once thought my login/password spreadsheet looked suspicious so they locked the file and I couldn’t access it. So download this and keep a hardcopy somewhere.
Second, assign their first blog post. Make it something easy. Ask them to write 200 words or more on a topic they feel passionate about. Make sure they include a picture. You are just making sure that they know how to create a post and include a picture. You can get to tagging, categories, widgets etc… later. This year I had them include tags in their first post, but it’s just getting started that we care about at this point.
Third, have a good old fashioned share fair. Using the spreadsheet open every single blog in class and have the students share it out. Make comments, give suggestions, give out verbal and actual high fives. At the end of every year I always kick myself for not sharing their blogs, in class, more often. Use their posts for daily or weekly grammar or writing activities. Share a picture of the day. Showing their blogs in class is one of the cooler things you can do in class. Have them share with the class when a new country views their blog.

One day North Korea… one day.
Once they have done this then you know you won’t have that many students saying “I don’t even know how to use WordPress.” Don’t confuse the writing instruction with the website instructions. Focus on the website at this point so your students can move beyond this stage and into the writing, which is the best part.
*For this week you may want to share some examples of past student blog posts that you like/love. Or give them a list of them and have them find their favorites and share them in a discussion folder. It’s helpful for them to see what is possible.

For first semester we are going to make sure that students can use all of the tools correctly before we have them attempt professional style posts. I use my “blogging basics” handout as a “spec sheet” for what I expect, if they want to earn a B on their posts. If they want an A they need to exceed the Mr. Theriault’s 2016 blogging spec sheet.
The embed above looks lame here, just click on the link above to have it open in a new window.
At some point when they are ready you are going to have them move to the Eighth Step: Creating Art, but each class might need to approach that step at a different time.
You will also have to decide how often the students will write and how long each post will be. I’ve had students write once a week and it was a little brutal towards the end of the semester, especially 2nd semester when I want them to write longer posts.
This year we will be publishing every other week. The week between publication week will be spent on editing, peer reviews, and my own feedback on their writing.
A NOTE ON STUDENT SAFETY: At some point in the first week or two I go over these basic rules to help keep my students safe online.
- Do not post pictures of yourself unless they are from behind or we can’t tell who you are.
- Do not post pictures of your friends with their names below the picture.
- Do not say where you are going to be in the future (clubs, amusement parks etc…)
- Leave as little personal information about yourself as possible.
- If someone leaves you a weird comment or you feel unsafe, please talk to me immediately.
- Do not use your full name on your blog. Do not tell people your specific age or what school you go to.

Now that they have each written a blog post or two it’s time to build community.
The first step to building community is to make sure that all of your blogs/websites can be found in one place. What I do is open the Google spreadsheet that was created with the Google form (from step four) including all of their information. Then I copy just the columns that have the name of their blog, their blog URL, and a brief description of their blog. Then you can just paste that into a wordpress page and students, parents, and others will be able to see all of the blogs in one spot. Make sure not to copy the other information, like their names, when you copy and paste from the spreadsheet. If you do it right, then it will look like this web page listing of student blogs. (scroll down a little to see them.)
The second step to creating a community is to have them follow each other’s blogs. They do NOT need to “like” each other’s blogs, but we will follow each other’s blogs. That is one of the benefits of everyone using wordpress. When you use WordPress and you follow another WordPress blog, any new post gets put into your “reader.” It’s pretty cool.
The third step is to ask the students to leave a comment on another student’s blog and leave a comment on ONE blog that is not a blogger from our school. I show the students how to find other WordPress blogs by subject and topic and then they find one or two of them to follow.
We talk about how leaving good comments builds community and its affect upon us. Sometimes I’ll just write something like this on the board:

But of course there are a ton of resources online regarding leaving good comments. One of my favorite resources are these delightful videos by Linda Yollis’ students, hosted on William Chamberlain’s Comments4Kids site. If those don’t work for you just open up Google and search away.
* I tell ALL of my students to set up their commenting settings to “approve each comment.” There is ZERO reason for them to have a negative comment below your blog. In Austin Kleon’s Show Your Work he makes a great point about how we do not have comments below artwork in museums, nor do we allow people to dump garbage in our living room. If I was the Tzar of the internet, I would require every site: YouTube, Newspapers, Blogs etc… to either hand approve comments OR just turn them off. If people REALLY want to comment on a story or idea they can create their own darn website, blog and put their comments there. Don’t make it easy for the trolls by leaving them an open space to dump their garbage.

Last week I asked my class to insert a link into their Google doc using the insert link tool. Over HALF of my class did NOT know how to do this. (Digital natives…snork,whoever came up with that concept didn’t work, for very long, in a classroom) Why did they not know how to do this? Well… because we treat computers like typewriters. We have kids write using their computers, but we don’t have them use all of the editing, formatting, and content creations tools that they will use in their job site.
The three most challenging aspects of writing online, for a student who is new to writing online, are: pictures, hyperlinks, and tagging.
Pictures and Photography
Challenge One: Finding or Taking Good Pictures- that’s easy, I recently wrote a blog post on how to take and find better photos.
Challenge Two: Making Sure That Their Pictures Are Legal- If you look at the bottom of the blog post, linked above, you will find several tips, tricks, and sources for finding photos that are legal to post on your blog. THIS IS IMPORTANT because… almost every year I have had wordpress.com delete or take down a student site because that student was not using legal images in their blog.
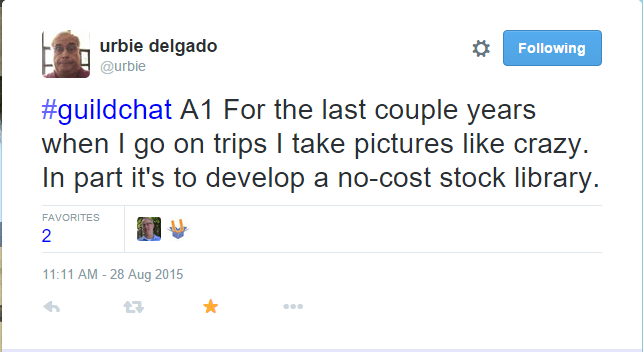
My two favorite solutions to this problem are first, use your own photos. This is why I take and post so many photos. I’m not alone in this solution.
My second favorite solution is to use an advanced Google image search to find images that are from a .gov site. If the picture was taken by the government, then it is okay for you to use in a non-commercial venture.
Challenge Three: Making Sure That Their Pictures Are Big Enough- please make sure they insert high resolution images into their blogs. Show them in a Google image search how to set the search to only find large images. Then make sure the image is centered and goes from the left to the right margins of your blog. No one wants to see an off-kilter post that looks like it’s leaning to the left because all of your images are left-aligned. The only time you can get away with an image that is smaller than the margins of your blog is when it is a vector image or a transparent GIF. Speaking of GIFs. I love them, but too many in a post can slow down load times and make the post look chaotic. The best GIFs are the type where just a part of the image moves, or the movement is subtle, like a cinemagraph.
Hyperlinks
The most important aspect of hyperlinking is audience awareness. I was guilty of this far too often when I first started blogging. The purpose of a good hyperlink is to enhance your writing and leave a gift to your reader.

Hopefully you have done some research when you were writing, or just know a lot about the subject. Why not direct your audience to something that will deepen their understanding of the topic, or just bring a smile to their face.
Make sure your students are highlighting text and using the insert text tool. Here is an example of what I mean. Instead of telling people to check out http://www.ideafm.org you should tell people that they should check out David Theriault’s short form share blog. Not only does it look better, but it helps Google find your blog post. Google looks for the words that are linked in your post. That is why you should never type “click here” when you want to leave a link, make sure the link is linked to the words that you want Google to associate with your blog post and the link. This leads us to another topic regarding search engine optimization.
Tagging
Tags are like #hashtags. They tell Google and your audience what topics are covered in your blog post. If you tag Harry Potter, you will have at least a few Potter fans check out your post. Tagging is another skill that is rarely covered in a traditional ELA class. If you want to introduce the idea of tagging you can have your students tag a poem that you project on the whiteboard. It works well and will help them see the many possibilities in tagging their own writing.

In this picture students are practicing hyperlinking and tagging with a poem from Poetry.org Poem-A-Day.
.

The phrase [RE]framing always confuses people. I think they imagine the frame of a piece of art. When I talk about [RE]framing I’m talking about the frames of a pair of glasses. Like these:

Sean, Chris, and I each look at the world differently. Even if we are looking at the same object we notice different things about the object and make different connections based on our experiences and the art and knowledge we have let into our minds and hearts. Ultimately I want my students to take something they learned in my class and [RE]frame it so that it has relevance for them, and in RE/mixing the concept through metaphor and connections they start creating art. The act of artistic creation is like carrying an egg across a chasm. You take the egg from where it was and transport it into a space where it was not.

There are a billion ways to do this in any class. You can do this in EVERY subject. Here are just a few examples of what [RE]framing could look like:
- comparing silence to the middle of donut
- comparing fixing professional development to a Kung-Fu movie
- comparing improving student achievement to Charlie and the Chocolate Factory
- comparing student engagement to Star Wars
I recommend finding your own examples like the video series Everything Is A Remix, or even just online articles. Heck you could even use an activity like Cintascotching to have your students practice taking a small piece of something and remixing it into something else.


My dad worked for a company whose sole mission was sharing. Ma Bell, old PacBell, was a company built around the idea of the importance of picking up a phone and sharing some ideas, some conversation with someone else. There are many things we can do with the time in our classroom, but what we spend out time on, will show students what we care most about. Having your students share their blogs is crucial to their success.
About 1/3 to 1/2 way into the semester have your students create a presentation using screen shots from their blog. Here are a few things they could put in their presentation.

I also think it’s good to see:
- Total views by month
- Most Viewed Post (ask them to explain why that one post was so popular)
- Best comment you’ve left
- Best comment left on your blog
- Best photo or picture and where did you find it or how did you make it
- What do you need to learn, what do you want to work on?
Here’s an example of what one of the presentations could look like:
SECRET TIME- so you know how people on Twitter say following is more important than followers because you learn from the people you are following? (1) Well that’s true, but… the more REAL followers I have the more likely I am to get my student’s work out into the public’s eye. I love sharing my students’ blogs. I only share their successes. I share them via Twitter, Google+, Pinterest, (TONS on Pinterest) and you can find all of Mr. Theriault’s student blogs on his blog. The one problem with Pinterest is that you need to sign up for Pinterest to see the posts, so I refreshed my student blog share site the past month and it looks pretty awesome I must say. You can go there and find student blog posts that are completely awesome.

The number one question I get about student blogging is well… I’m sure you’ve been thinking about it for a while. Well, how do you grade your student blogs. Listen… grading, evaluation, is a mess and don’t let anyone ever tell you otherwise. You can use a single point rubric, (a great example created by Sean Ziebarth) or a rubric built on the Common Core State Standards, or some other esoteric method you have devised. Regardless of the strategy, grading takes time so you are just going to figure out how much time you want to devote to assigning a grade to the blogs, heck you could NOT grade the blogs, but at my school grades are a currency that helps students make time for what they think is important so I give out grades.
But what I’m more interested in is improving student writing and grades rarely do that. In fact if you REALLY want to improve student writing do the following:
- Read this article on what really makes writing good.
- Have a student bring you their writing during lunch. (This is a pro move, only when a student WANTS to become a better writer, do they. By asking them to bring their writing in at lunch as an optional activity, you see who really wants to get better)
- Read their writing.
- Pick the ONE thing in their writing that needs the most attention and show them how to fix it. Then have them show you they understand.
- Assign them another similar piece of writing and tell them you are going to focus on that one thing plus one more aspect.
- When they bring you in the next piece of writing see if they got that ONE thing right and then find another skill to work on.
But Theriault, that will take FOREVER. Yup.
About the most complicated thing I know about is hitting in baseball. When you work with a kid on hitting you cannot tell them three things to fix. You pick ONE thing and then you work on it and then the next week you see if it’s still fixed and then pick the next thing to work on.
Since I have 185 students the lunch thing isn’t going to work with all of my students. So I had to think of something else. That something else is what I called “Tune-It-Up Tuesdays.” Now this isn’t some new idea. People do daily or weekly skill development all the time. But what I tried to do was tie the skill into a music metaphor and then focus on that ONE skill when I was looking at their blogs. I might notice other things, I might comment on other things, but I was going to focus on ONE thing. Here are some examples of Tune-It-Up Tuesday skills:
- RE/Mixing Ideas By Integrating Quotations
- This Is The End- Choosing A Door To Close
- HELP- I need somebody to help me with my writing
My goal was to go around the room in ONE period and give EVERYONE feedback on the one area of focus BEFORE they turned in their writing, because feedback is most useful when it happens before you assign a grade (or when there is no grade at all) not when you assign the grade. (That’s a fact)

When your decide to start wrapping up your student’s blogging journey it’s time for a good old-fashioned reflection. Reflection is one of the most important stages of learning and if you don’t regularly have your students reflect on their learning journey, then you are leaving some of the best parts of the learning process on the shop floor. Here are a few of my students’ (just from last year) reflection on their blogs.
- Bloggin Is Like Joggin (funny and smart)
- The Real Me: An amazing reflection using The Who
- What Lies Near The Heart (so good)
- Looking Back On My Blogging Adventure
Final thoughts: I’ve said this before and it’s still true. I would give up EVERYTHING I do in the class, but as long as I can read something beautiful and then have my students publish their creation in response to that piece of writing, I’m a happy camper. Student publishing has transformed me as a teacher and I will never give it up.
I know it’s scary to have students doing things outside your class, for your class, but student autonomy is crucial to learning and to their development as human beings. It was a little scary to have our son take shop in 7th grade with the power tools, band saws and other instruments of injury, but our trust in him and the adventurous nature of the class allowed him to make not one but two skateboards (from scratch) in his Woodshop II class in 8th grade. When he handed me my first long-board, I never felt prouder. Let your students do something risky, the adventure is what makes each moment so important.

*If you have any questions please put them in the comments below or ask me on Twitter and I’ll include them in a Q and A section below. Thanks.

This gave me a nostalgia trip back to sophomore year, when you were first trying all this stuff out.
Thanks for sharing all of these useful tips. I’m going to try this with my students, I think.
Hi David,
Came across to check your blogging resources after reading about your presentation from CUE 2015 in the post Gail published – http://blogwalker.edublogs.org/2015/11/05/fall-cue-2015-some-awesome-takeaways/
Great tips! One thing that I wasn’t aware of was “almost every year I have had wordpress.com delete or take down a student site because that student was not using legal images in their blog.” Flabbergasted is probably an understatement.
Requirement for dealing with a DCMA for a hosting service is we need to remove the offending copyright content from the site. If it is an image we’re required to remove the image from our servers and sent notification to the person who submitted the DCMA confirming it had been removed. In our situation we remove the image from the post and send a follow up email to the blogger to explain why it had to be removed and we use it as a teachable moment to educate them on the appropriate use of content online.
WP.com’s DMCA process implies they follow similar guidelines and that the image should only be removed – https://en.support.wordpress.com/our-dmca-process/
FYI use of copyright images is the most common issue for student bloggers while teachers are more likely to caught out by copyright documents because assume that Fair Use Laws apply (which they don’t).
Sue Waters
@suewaters
Thank you for this incredible resource. I’ve known for a long time that student publishing is the way to go (I want them to write well for other people, not just because their teacher is marking it.) Though I am VERY intimidated to begin, this will be in my professional development plan for the fall. I will be teaching two Grade 12 classes and a Grade 10 class-which do you recommend starting with? Thanks again for the great post.